How Can We Help?
Search for answers or browse our knowledge base.
-
DLP Programmes
-
How To Guides
-
Symantec Articles
-
- Converting your LOB tables from BasicFiles to SecureFiles format in Symantec Data Loss Prevention 14.6 and 15.x:
- Error: "ORA-28000: the account is locked" in Symantec DLP Enforce
- How to change the "protect" user password in the Oracle database for Symantec DLP
- How to default to the local database when logging in from the command line
- How to Extend Oracle tablespace (LOB_TABLESPACE, USERS, etc.) when almost full
- How to Remove Oracle Database Client Software for symantec DLP
-
- Best Practice for Endpoint Agents with Antivirus Protection
- Creating a new agent attribute in Symantec DLP
- Generating agent installation packages for Symantec DLP
- How to collect the Endpoint Agent logs
- How to install the Symantec DLP Agent (Windows)
- How to remove the Symantec DLP Endpoint Agent (Mac)
- How to remove the Symantec DLP Endpoint Agent (Windows)
- How to Speed up the incident traffic from endpoint to endpoint server
- How to start DLP Agents that run on Mac endpoints
- How to troubleshoot DLP Agent status not reporting as expected on Enforce
- Troubleshoot Agents not reporting into the Enforce Console
- Troubleshooting Symantec File Reader Restarts
-
- Configuring LDAP Lookup Plugins in Symantec DLP 15.5+
- Creating a new agent attribute in Symantec DLP
- Default ports used by Symantec DLP
- Disable SSLv3, TLSv1.1, and TLSv1.0 on Data Loss Prevention components
- fixing Enforce Server migration fail for three-tier environments due to "DatabaseProcessCheck"
- Generating Syslog messages from Symantec Data Loss Prevention
- How To Access DLP incidents
- How to Configure AD User login Authentication in Enforce for Data Loss Prevention 15.x and above
- How to configure the LDAP Lookup Plug-In within Symantec DLP
- How to create a report in Symantec DLP
- How to Create a User Role in Symantec DLP
- How to Create Users in Symantec DLP
- How to create, sign, and import an SSL certificate signed by a Trusted Certificate Authority
- How to create, start & stop Discover scans in Symantec DLP
- How to enable Finest level logging on DLP agents
- How to enable Syslog Logging for Symantec Data Loss Prevention
- How to export incidents in Symantec DLP
- How to Filter Incidents and Summarise in Symatec DLP
- How to gather a process dump using the ProcDump Tool
- How to increase the max number of incidents exported within Symantec DLP
- How To Login to the Symantec DLP Console
- How to Obtain a Broadcom/Symantec Support Site ID
- How to obtain the Symantec DLP Server Log files: location and description
- How to Restart Symantec DLP services (14.6-15.0)
- How to Restart Symantec DLP Services for Oracle Patching
- How To Restore the DLP Enforce Server across platforms in three-tier deployments
- How to Set Incident Status in Symantec DLP
- How to solve Error: "Error 1802: Corrupted incident received"
- The maximum number of Agents than can be allowed to export, print or mail from Agents Summary Report or Agents Legacy Summary Report.
- What Are the Differences Between the “same” and “any” Components in Symantec DLP Rules?
- Show all articles ( 15 ) Collapse Articles
-
- Best Practices for Scanning Files Larger Than 30MB Using Discover
- Default ports used by Symantec DLP
- How To Access DLP incidents
- How to Filter Incidents and Summarise in Symatec DLP
- How To troubleshoot DLP Network Discover scan common errors
- Symantec Network Detection is not working for DLP User Groups that index the Domain Users AD Security Group
- Troubleshooting Symantec File Reader Restarts
-
< All Topics
Print
How to create a report in Symantec DLP
Posted
Updated
ByJosh Kee
0 out of 5 stars
| 5 Stars | 0% | |
| 4 Stars | 0% | |
| 3 Stars | 0% | |
| 2 Stars | 0% | |
| 1 Stars | 0% |
Creating a Report
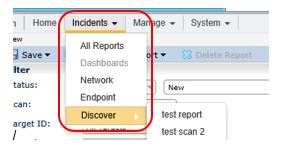
1. To create a report, go to Incidents -> Discover:

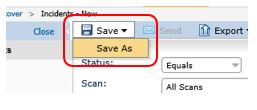
2. From here select the appropriate filters from which you would like to base the report on (see How to Filter and Summarise Incidents). Then go to the Save feature and select Save As.

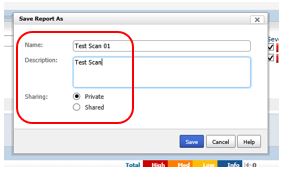
3. From here a window will pop up. Enter the report name and description, then select whether you would like the report to be Private or Shared, then click Save.

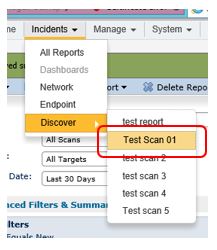
4. To access these reports, go to Incidents -> Discover like before and when you hover over Discover you will now see all available reports listed. Click on the relevant report to open it.

Was this article helpful?
0 out of 5 stars
| 5 Stars | 0% | |
| 4 Stars | 0% | |
| 3 Stars | 0% | |
| 2 Stars | 0% | |
| 1 Stars | 0% |
Table of Contents
